Create Your Own Quilting Design


Advanced
|
2 hours

Taught by Sue Nickels
In Part 1, you will learn how to design your own quilting patterns and create custom templates. Using an already-pieced quilt top, Sue demonstrates how to create a design concept and sketch patterns. All of the basics are covered here, including how to design patterns using rulers, how to cut out your own template plastic, and how to create a cable pattern using a paper folding technique. She also shows how to draw her signature feather motif and turn it into a circular template. Once you have completed this class, you will be ready to move on to marking your quilt.
Learn how to:
- Which motifs should go in various areas of the quilt
- How to space out patterns on quilt
- How to transform a small-scale quilting design to a full-size design
- How to draw a feather motif
- How to create a circular feather template
- How to use rulers to create grids, rays, and triangles
- How to create a scallop pattern in two different ways
- How to design cable patterns using a paper folding technique
Chapters
|
01:04
|
|
00:42
|
|
09:01
|
|
07:58
|
|
08:02
|
|
03:52
|
|
06:17
|
|
00:57
|
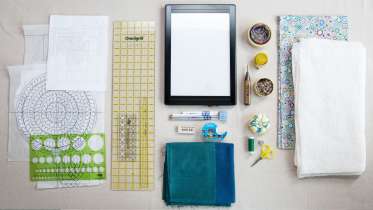
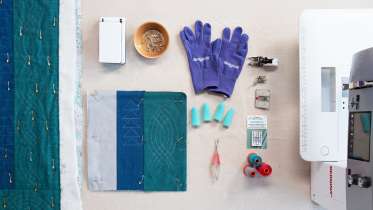
Materials
Here’s what you’ll need:

Member Gallery
Browse members' projects from this class, add them to your Favorites, and share your own work!
Load More
Discussion
Notes
Your timecode tags and notes for this section
Transcript
Free-Motion Quilting
Now Playing
Part 1:
Create Your Own Quilting Design
In Part 1, you will learn how to design your own quilting patterns and create custom templates. Using an already-pieced quilt top, Sue demonstrates how to create a design concept and sketch patterns. All of the basics are covered here, including how to design patterns using rulers, how to cut out your own template plastic, and how to create a cable pattern using a paper folding technique. She also shows how to draw her signature feather motif and turn it into a circular template. Once you have completed this class, you will be ready to move on to marking your quilt.
Part 2:
Marking and Basting
Once you have designed your quilting motif, the next step is to mark your quilt top. Sue teaches several methods for transferring your pattern to fabric, including tracing patterns using a lightbox, freehand drawing, tracing plastic templates and using rulers as guides to create geometric patterns. Finally, Sue covers basting your quilt sandwich to prepare it for machine quilting.
Part 3:
Machine Quilting Like a Pro
Now for the fun part—machine quilting! Sue teaches you all about her favorite part of the quilting process in this final class. Learn how to work with a large quilt and use free-motion quilting techniques to create feathers, straight-line geometric shapes, scallops, and cables. You will be amazed at what you can do with a sewing machine and a darning foot.
Who's Recently Taken This Class
Meet other crafters who have recently taken this class.
AJ Grossman

Sue Daugherty
Carol Alston
Mary Jane Bonelitz
Laurie Owen
Frances Moore
Diane Byatt
sue
June Gregg
S L FOST
Sharon Coulombe
Patty Provost
Lisa Evola
Dana Stidham

Sharon Riddle
Julia Hunt
Polly Stahl
Megen Wilson
Purple Phantom
Wanda Anderson
Related Classes